.jpg)
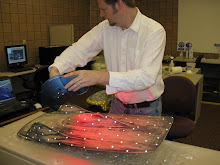
Using our REVscan 3D scanner, http://um3d.dc.umich.edu/resources/hardware/res_hardware_laserscanner.html, I captured the 3D geometry of a 12" high bust. Overall, the scan turned out nice but detail was lost in the face, especially around the eyes.

Reducing the volume box allows for a greater resolution scan. The Handyscan allows you to resize and move the bounding box while retaining positional data making part alignment a snap. The higher resolution captures more detail but positional markers become noticeable.

Using Magics by Materialize I can cut away positional markers from the high resolution scan of the face. I also cut the face away from the low resolution scan of the bust but keep the surfaces of the positional markers cut away from the high resolution face scan.

With the low resolution scan of the face and positional markers out of the way, I stitch the high resolution face scan to the low resolution bust without interference from the larger facets of the bust while retaining the geometry of the face where the positional markers were removed. In this photo, the difference in facet resolution between the high and low resolution scans is very noticeable.

Polygon reduction followed by a soothing operation produced a nicely decimated surface mesh.

Bad edges, inverted normals, and overlapping triangles are resolved using the surface mesh repair tools provided in Magics to create a 3D model ready for visualization or rapid prototyping.
No comments:
Post a Comment